Theano简介
原文地址:https://morvanzhou.github.io/tutorials/machine-learning/theano/
theano 和 tensorflow 类似,都是基于建立神经网络每个组件,在把组件联系起来,数据放入组件,得到结果。
一、基本用法
- 首先, 需要加载 theano 和 numpy 两个模块, 并且使用 theano 来创建 function
import numpy as np
import theano.tensor as T
from theano import function
- 定义X和Y两个常量 (scalar),把结构建立好之后,把结构放在function,在把数据放在function。
# basic
x = T.dscalar('x')  # 建立 x 的容器
y = T.dscalar('y')  # 建立 y 的容器
z = x+y     #  建立方程

# 使用 function 定义 theano 的方程,
# 将输入值 x, y 放在 [] 里,  输出值 z 放在后面
f = function([x, y], z)

print(f(2,3))  # 将确切的 x, y 值放入方程中
# 5.0

from theano import pp
print(pp(z)) #  pp (pretty-print) 打印原始方程
# (x + y)
5.0
(x + y)
- 定义矩阵,以及利用矩阵做相关运算:
x = T.dmatrix('x')  # 矩阵 x 的容器
y = T.dmatrix('y')  # 矩阵 y 的容器
z = x + y   # 定义矩阵加法
f = function([x, y], z) # 定义方程

print(f(
    np.arange(12).reshape((3,4)), # x
    10*np.ones((3,4)) # y
    )
  )
[[10. 11. 12. 13.]
 [14. 15. 16. 17.]
 [18. 19. 20. 21.]]
二、Function用法
import numpy as np
import theano.tensor as T
import theano
theano 当中的 function 就和 python 中的 function 类似, 不过因为要被用在多进程并行运算中,所以他的 function 有他自己的一套使用方式.
以下介绍function的三种用法,并且各举一个例子。
1. 激励/活函数例子(activation function)
深度学习的基本原理是基于人工神经网络,信号从一个神经元进入,经过非线性的activation function,传入到下一层神经元;再经过该层神经元的activate,继续往下传递,如此循环往复,直到输出层。激励函数一般用于神经网络的层与层之间,上一层的输出通过激励函数的转换之后输入到下一层中。神经网络模型是非线性的,如果没有使用激励函数,那么每一层实际上都相当于矩阵相乘。经过非线性的激励函数作用,使得神经网络有了更多的表现力。
# 1. 首先需要定义一个 tensor T:
x=T.dmatrix('x')
# 2. 声明概率计算方法(要用Theano里面的计算方式)
s=1/(1+T.exp(-x)) # logistic or soft step
# 3. 调用theano定义的计算函数logistic
logistic=theano.function([x],s)

print(logistic([[0,1],[-2,-3]]))
[[0.5        0.73105858]
 [0.11920292 0.04742587]]
2. 多输入/输出的 function
假定我们的 theano 函数中的输入值是两个,输出也是两个。 指定输入的值是矩阵a,b
a,b=T.dmatrices('a','b')

diff=a-b # 差(diff)
abs_diff=abs(diff) # 差的绝对值(abs_diff)
diff_squared=diff**2 # 差的平方(diff_squared)

f=theano.function([a,b],[diff,abs_diff,diff_squared]) # 两个输入,三个输出
调用函数f, 并且向函数传递初始化之后的参数
x1,x2,x3=f( # x1,x2,x3分别对应三个输出值
    np.ones((2,2)), # a
    np.arange(4).reshape((2,2)) # b
)
print(x1,'\n\n',x2,'\n\n',x3)
[[ 1.  0.]
 [-1. -2.]]

 [[1. 0.]
 [1. 2.]]

 [[1. 0.]
 [1. 4.]]
3. function的默认值及指定参数名
首先,使用 T.dscalars() 同时定义三个标量的容器以及输出值z
x,y,w = T.dscalars('x','y','w')
z = (x+y)*w
(1)使用 theano 的默认值书写方式指定参数的默认值
f = theano.function( [x, theano.In(y,value=1), theano.In(w,value=2)], z) # In是什么函数?


print(f(23))    # 使用默认
print(f(23,1,4)) # 不使用默认
48.0
96.0
(2)还可以在定义默认值的时候,可以指定参数名字。 这样做的目的是防止我们定义的参数过于多的情况下,忘记函数的顺序。
f = theano.function([x,
                     theano.In(y, value=1),
                     theano.In(w,value=2,name='weights')],
                    z)

print (f(23,1,weights=4)) ##调用方式
96.0
三、Shared变量
import numpy as np
import theano
import theano.tensor as T
Shared 变量,意思是这些变量可以在运算过程中,不停地进行交换和更新值。 在定义 weights 和 bias 的情况下,会需要用到这样的变量。
1. 定义Shared变量
用累加器来定义 Shared 变量,每一次向上面加一个值,每一次基于上面的变化,再加上另一个值,就这样不断地更新并保存这样的值。
用 np.array 给它赋予初始值,初始值是 0,并且它的数据类型要规定好。 数据类型是很重要的,在后面要定义 vector 或者 matrix 的时候,一定要统一,否则就会报错。 这个例子中,我们定义它为 float64,所以在后面定义其他结构的时候,也要保证这样的数据类型。 最后一个参数就是它的名字 ‘state’。
state=theano.shared(np.array(0,dtype=np.float64),'state')
下面是累加值,定义它的名字为 inc,还有它的数据类型,调用 state.dtype,而不是写 dtype=np.float64, 否则会报错。
inc=T.scalar('inc',dtype=state.dtype)
接下来是要定义一个 accumulator 函数,它的输入参数为 inc,结果就是输出 state,累加的过程叫做 updates,就是要把现在的 state 变成 state+inc 。
accumulator=theano.function([inc],state,updates=[(state,state+inc)])
2. 提取使用
打印: 不能直接用 print(accumulator(10)),因为这样输出的,第一次就是初始值 0,只能到下一次输出的时候,才会出现 10. 下面这个更科学,它可以取出 state 的当前值,我们可以先后 +1, +10, 打印结果看看如何
即,先调用后输出
# to get variable value
print(state.get_value())
# 0.0

accumulator(1)   # return previous value, 0 in here
print(state.get_value())
# 1.0

accumulator(10)  # return previous value, 1 in here
print(state.get_value())
# 11.0
0.0
1.0
11.0
而 set_value 可以用来重新设置参数,例如 把 11 变成了 -1,那么再 +3 之后就是 2,而不是 11+3=14.
# to set variable value
state.set_value(-1)
accumulator(3)
print(state.get_value())
# 2.0
2.0
get_value, set_value 这两种只能在 Shared 变量 的时候调用。
3. 临时使用
有时只是想暂时使用 Shared 变量,并不需要把它更新: 这时我们可以定义一个 a 来临时代替 state,注意定义 a 的时候也要统一 dtype。
a = T.scalar(dtype=state.dtype)
然后忽略掉 Shared 变量 的运算,输入值是 [inc, a],相当于把 a 代入 state,输出是 tmp_func,givens 就是想把什么替换成什么。 这样的话,在调用 skip_shared 函数后,state 并没有被改变。
# temporarily replace shared variable with another value in another function
tmp_func = state * 2 + inc
a = T.scalar(dtype=state.dtype)
skip_shared = theano.function([inc, a], tmp_func, givens=[(state, a)]) # temporarily use a's value for the state
print(skip_shared(2, 3))
# 8.0

print(state.get_value()) # old state value
# 2.0
8.0
2.0
四、Layer类
1. 准备
import theano
import theano.tensor as T
import numpy as np
定义一个具有两层神经元的神经网络
l1=Layer(inputs,1,10,T.nnet.relu)
l2=Layer(l1,outputs,10,None)
2. 定义层结构
class Layer(object):
    def __init__(self, inputs, in_size, out_size, activation_function=None):
        self.W = theano.shared(np.random.normal(0, 1, (in_size, out_size)))
        self.b = theano.shared(np.zeros((out_size, )) + 0.1)
        self.Wx_plus_b = T.dot(inputs, self.W) + self.b
        self.activation_function = activation_function
        if activation_function is None:
            self.outputs = self.Wx_plus_b
        else:
            self.outputs = self.activation_function(self.Wx_plus_b)
3. 细节说明
这段代码中,我们最关心的就是这个类的构造函数
def __init__(self, inputs, in_size, out_size, activation_function=None)
和之前的例子一致,我们采用了相同的输入变量名。
接着,我们定义了W,b来代表该神经网络层的输入权值和偏置值,我们把W初始化为由符合均值为0, 方差为1高斯分布的随机变量值组成的in_size-by-out_size的矩阵; b初始化为值为0.1的out_put-by-1的向量。 (当然,我们也可以采用不同的初始化方法,这里我们暂时不讨论初始化权值对最终神经网络训练的影响)。
self.W = theano.shared(np.random.normal(0, 1, (in_size, out_size)))
self.b = theano.shared(np.zeros((out_size, )) + 0.1)
首先我们要计算所有神经元的输入矩阵, 也就是输入inputs与输入权值W的点乘(dot product)再加上偏置值b:
self.Wx_plus_b = T.dot(inputs, self.W) + self.b
然后,我们需要根据我们构造神经层指定的激活函数类型activation_function,来计算神经层的输出向量。 这里我们假设如果activation_function是None, 那就是该层神经元采用线形输出;如果是其他Theano的激活函数,就把Wx_plus_b作为该层激活函数的输入,同时函数的输出即为神经层的输出:
self.activation_function = activation_function
if activation_function is None:
	self.outputs = self.Wx_plus_b
else:
	self.outputs = self.activation_function(self.Wx_plus_b)
我们就成功的定义了神经网络的最最重要的结构–神经层Layer。
五、回归例子Regression
1. 导入模块
import theano
import theano.tensor as T
import numpy as np
import matplotlib.pyplot as plt
2. 定义层结构
class Layer(object):
  def __init__(self,inputs,in_size,out_size,activation_function=None):
    self.W=theano.shared(np.random.normal(0,1,(in_size,out_size)))
    self.b=theano.shared(np.zeros((out_size,))+0.1)
    self.Wx_plus_b=T.dot(inputs,self.W)+self.b
    self.activation_function=activation_function
    if activation_function is None:
      self.outputs=self.Wx_plus_b
    else:
      self.outputs=self.activation_function(self.Wx_plus_b)
3. 准备数据集
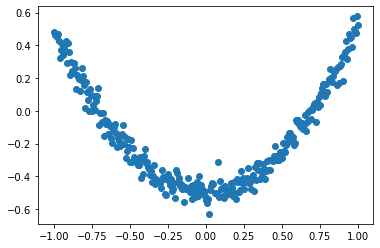
构造一组x、y,其中y的值都是对应的函数值接近的数值。即y = x^2 - 0.5 + noise
x_data=np.linspace(-1,1,300)[:,np.newaxis] # 生成-1到1之间均匀间隔的300个数,再扩充为二维
noise=np.random.normal(0,0.05,x_data.shape)
y_data=np.square(x_data)-0.5+noise
plt.scatter(x_data,y_data)
plt.show()

4. 搭建网络
(1) 定义神经网络的输入和目标
x=T.dmatrix('x')
y=T.dmatrix('y')
(2) 设计神经网络
l1 = Layer(x, 1, 10, T.nnet.relu)
l2 = Layer(l1.outputs, 10, 1, None)
(3) 定义损失函数
cost=T.mean(T.square(l2.outputs-y))
(4) 计算神经网络权值和偏置值的梯度
gW1,gb1,gW2,gb2=T.grad(cost,[l1.W,l1.b,l2.W,l2.b])
(5) 定义一个学习率
learning_rate=0.05
(6) 描述训练过程
train=theano.function(
    inputs=[x,y],
    outputs=cost,
    updates=[(l1.W,l1.W-learning_rate*gW1),
        (l1.b,l1.b-learning_rate*gb1),
        (l2.W,l2.W-learning_rate*gW2),
        (l2.b,l2.b-learning_rate*gb2)
    ]
)
WARNING (theano.tensor.blas): We did not find a dynamic library in the library_dir of the library we use for blas. If you use ATLAS, make sure to compile it with dynamics library.
(7) 定义一个预测函数
predict=theano.function(inputs=[x],outputs=l2.outputs)
5. 开始训练
for i in range(1000):
  err=train(x_data,y_data)
  if i % 50==0:
    print(err)
1.7817381967261003
0.03900273780119691
0.01705260292529913
0.008857913877541073
0.007628401545243699
0.007154872218835795
0.006845074417545497
0.006603734725625393
0.006393439520042726
0.006211410026813022
0.00604399098088469
0.005888642078912878
0.005751130914528592
0.005627157029312892
0.005515948932985979
0.005409217763685208
0.005315212511973516
0.0052381625906053695
0.005167258521000119
0.005103197798244597
6. 可视化
# plot the real data
fig = plt.figure()
ax = fig.add_subplot(1,1,1)
ax.scatter(x_data, y_data)
plt.ion()
plt.show()

for i in range(1000):
    # training
    err = train(x_data, y_data)
    if i % 50 == 0:
        # to visualize the result and improvement
        try:
            ax.lines.remove(lines[0])
        except Exception:
            pass
        prediction_value = predict(x_data)
        # plot the prediction
        lines = ax.plot(x_data, prediction_value, 'r-', lw=5)
        plt.pause(.5)


# 只显示最后结果
# for i in range(1000):
#     # training
#     err = train(x_data, y_data)

# prediction_value = predict(x_data)
# # plot the prediction
# lines = ax.plot(x_data, prediction_value, 'r-', lw=5)

六、分类学习
1. 导入模块
import numpy as np
import theano
import theano.tensor as T
2. 定义函数
先定义一个功能,用来计算分类问题的准确率,即预测的类别中有多少是和实际类别一样的,计算出百分比
def compute_accuracy(y_target,y_predict):
  correct_prediction=np.equal(y_predict,y_target)
  accuracy=np.sum(correct_prediction)/len(correct_prediction)
  return accuracy
3. 准备数据集
用randn随机生成数据集。D中的input_values是400个样本,784个feature。target_class是有两类,0和1。要做的是,用神经网络训练数据学习哪些输入对应0,哪些对应1.
rng=np.random

N=400 # training 数据个数
feats=784  # input 的 feature 数

# 生成随机数: D = (input_values, target_class)
input_values=rng.randn(N,feats)
target_class=rng.randint(size=N,low=0,high=2)
D=(input_values,target_class)
print(input_values.shape,target_class.shape)
(400, 784) (400,)
4. 建立模型
(1)定义x和y容器
# 定义x、y容器
x=T.dmatrices("x")
y=T.dvector("y")
(2)初始化weights和bias
有多少features就生成多少个weights
W=theano.shared(rng.randn(feats),name="w")
b=theano.shared(0.,name="b")
w b
(3) 定义激励函数、交叉熵
p_1是用sigmoid求的概率,输入越小,则概率值越接近0,越大则越接近1,等于0则值为0.5. p_1 > 0.5时,预测值为True,即为1。然后计算针对每个sample的交叉熵xent。 再计算整批数据的cost,为了减小overfitting,这里加入了L1-正则化。接下来可以计算weights和bias的梯度gW,gb。
p_1 = T.nnet.sigmoid(T.dot(x, W) + b)   # sigmoid 激励函数
prediction = p_1 > 0.5
xent = -y * T.log(p_1) - (1-y) * T.log(1-p_1) # 交叉熵

# xent 也可以使用下面这个达到一样的效果
# xent = T.nnet.binary_crossentropy(p_1, y)

cost = xent.mean() + 0.01 * (W ** 2).sum()  # l2 正则化
gW, gb = T.grad(cost, [W, b])
5. 激活模型
学习率需要小于 1. 接下来定义两个函数 train 和 predict,方法和上一节课的类似。 outputs 可以输出两个 prediction 和交叉熵损失的平均值 xent.mean。
learning_rate = 0.1
train = theano.function(
          inputs=[x, y],
          outputs=[prediction, xent.mean()],
          updates=((W, W - learning_rate * gW), (b, b - learning_rate * gb)))
predict = theano.function(inputs=[x], outputs=prediction)
WARNING (theano.tensor.blas): We did not find a dynamic library in the library_dir of the library we use for blas. If you use ATLAS, make sure to compile it with dynamics library.
6. 训练模型
用训练集的 feature 和 target 训练模型,输出预测值和损失 pred, err。 每 50 步打印一次损失和准确率。
# Training
for i in range(500):
    pred, err = train(D[0], D[1])
    if i % 50 == 0:
        print('cost:', err)
        print("accuracy:", compute_accuracy(D[1], predict(D[0])))
cost: 12.553807719422512
accuracy: 0.4775
cost: 6.726440247644676
accuracy: 0.5725
cost: 3.171624657015871
accuracy: 0.6925
cost: 1.350026797131612
accuracy: 0.82
cost: 0.5344876981014164
accuracy: 0.92
cost: 0.20028190520309347
accuracy: 0.9775
cost: 0.12085672355644826
accuracy: 0.995
cost: 0.08779645850799486
accuracy: 0.9975
cost: 0.06446280613696766
accuracy: 0.9975
cost: 0.04648645334444508
accuracy: 0.9975
最后打印出预测值与实际值进行比较
print("target values for D:")
print(D[1])
print("prediction on D:")
print(predict(D[0]))
target values for D:
[0 1 1 0 1 1 0 1 1 1 0 1 1 1 1 1 0 1 0 0 0 0 0 1 0 0 0 0 1 1 1 0 0 1 1 0 1
 0 1 0 0 1 1 0 0 0 1 1 0 0 0 0 0 1 0 0 0 0 0 0 1 1 0 0 1 0 1 1 0 0 0 0 1 0
 1 1 0 1 0 1 1 1 1 1 0 0 1 0 0 1 0 0 1 0 1 0 1 0 0 1 1 0 1 0 1 0 0 0 0 1 1
 1 1 0 0 1 1 0 1 0 0 0 1 1 0 0 1 0 0 0 1 0 0 1 0 1 0 0 0 0 1 1 0 0 0 1 1 0
 0 0 0 1 1 0 1 0 0 1 0 1 0 0 0 1 0 1 1 1 0 0 1 1 0 0 0 0 0 0 1 0 0 1 1 0 0
 0 0 0 0 0 0 0 0 1 0 1 0 1 1 0 1 0 0 1 0 0 1 1 0 1 0 0 0 1 0 1 1 0 0 0 0 0
 0 0 1 1 0 1 1 1 1 0 0 1 1 0 0 0 1 1 1 0 0 1 1 0 1 1 1 0 0 1 0 0 1 0 1 0 1
 0 1 0 0 0 1 0 1 0 1 0 0 0 0 1 1 1 0 0 1 1 1 1 0 1 1 1 1 0 0 0 0 1 0 0 1 0
 0 1 1 0 0 0 1 0 1 1 0 0 1 0 0 0 0 1 1 0 0 1 1 0 1 0 1 1 0 1 0 1 1 0 0 0 1
 1 1 0 1 1 1 1 1 1 1 1 1 0 0 1 1 0 0 0 1 1 0 0 0 0 1 1 0 1 0 0 0 0 0 1 1 0
 1 1 0 0 0 0 0 1 0 1 0 0 0 1 0 1 0 0 0 0 1 0 0 1 1 1 0 1 0 0]
prediction on D:
[False  True  True False  True  True False  True  True  True False  True
  True  True  True  True False  True False False False False False  True
 False False False False  True  True  True False False  True  True False
  True False  True False False  True  True False False False  True  True
 False False False False False  True False False False False False False
  True  True False False  True False  True  True False False False False
  True False  True  True False  True False  True  True  True  True  True
 False False  True False False  True False False  True False  True False
  True False False  True  True False  True False  True False False False
 False  True  True  True  True False False  True  True False  True False
 False False  True  True False False  True False False False  True False
 False  True False  True False False False False  True  True False False
 False  True  True False False False False  True  True False  True False
 False  True False  True False False False  True False  True  True  True
 False False  True  True False False False False False False  True False
 False  True  True False False False False False False False False False
 False  True False  True False  True  True False  True False False  True
 False False  True  True False  True False False False  True False  True
  True False False False False False False False  True  True False  True
  True  True  True False False  True  True False False False  True  True
  True False False  True  True False  True  True  True False False  True
 False False  True False  True False  True False  True False False False
  True False  True False  True False False False False  True  True  True
 False False  True  True  True  True False  True  True  True  True False
 False False False  True False False  True False False  True  True False
 False False  True False  True  True False False  True False False False
 False  True  True False False  True  True False  True False  True  True
 False  True False  True  True False False False  True  True  True False
  True  True  True  True  True  True  True  True  True False False  True
  True False False False  True  True False False False False  True  True
 False  True False False False False False  True  True False  True  True
 False False False False False  True False  True False False False  True
 False  True False False False False  True False False  True  True  True
 False  True False False]
七、正则化
在用机器学习模型时,会把数据集分为训练集和测试集,训练集用来学习模型,测试集相当于新数据,用来检验模型的效果。
如果对于训练集,学习的效果非常好,甚至接近完美地穿过每个点,或者非常准确地进行了分类,但是当把这个模型应用于新的数据集上,表现却特别差,这种现象就叫***过拟合***。
所以在实际运用时要尽量减小 overfitting。常用的方法有 L1,L2 正则化。
1. 导入模块并导入数据
import theano
from sklearn.datasets import load_boston
import theano.tensor as T
import numpy as np
import matplotlib.pyplot as plt
数据用的是 load_boston 房价数据,有 500 多个样本,13 个 feature,每个样本对应一个房价。 其中 y 通过增加维度 [:, np.newaxis] 由列表结构变成了矩阵的形式。
# 定义数据归一化函数
def minmax_normalization(data):
    xs_max = np.max(data, axis=0)
    xs_min = np.min(data, axis=0)
    xs = (1 - 0) * (data - xs_min) / (xs_max - xs_min) + 0
    return xs
# 加载数据
np.random.seed(100)
x_data = load_boston().data
# minmax normalization, rescale the inputs
x_data = minmax_normalization(x_data)
y_data = load_boston().target[:, np.newaxis]

# 把数据集分为训练集和测试集
x_train, y_train = x_data[:400], y_data[:400]
x_test, y_test = x_data[400:], y_data[400:]

x = T.dmatrix("x")
y = T.dmatrix("y")
2. 建立模型
建立两个神经层,l1 有 13 个属性,50 个神经元,激活函数是 T.tanh。 l2 的输入值为前一层的输出,有 50 个,输出值为房价,只有 1 个
class Layer(object):
    def __init__(self, inputs, in_size, out_size, activation_function=None):
        self.W = theano.shared(np.random.normal(0, 1, (in_size, out_size)))
        self.b = theano.shared(np.zeros((out_size, )) + 0.1)
        self.Wx_plus_b = T.dot(inputs, self.W) + self.b
        self.activation_function = activation_function
        if activation_function is None:
            self.outputs = self.Wx_plus_b
        else:
            self.outputs = self.activation_function(self.Wx_plus_b)
l1=Layer(x,13,50,T.tanh)
l2=Layer(l1.outputs,50,1,None)
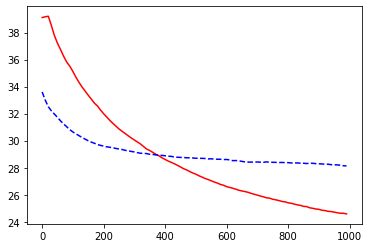
计算 cost,第一种表达式是没有正则化的时候,会发现 overfitting 的现象。 第二种是加入 L2 正则化的表达,即把所有神经层的所有 weights 做平方和。 第三种是加入 L1 正则化的表达,即把所有神经层的所有 weights 做绝对值的和。 接着定义梯度下降。
# the way to compute cost
# cost = T.mean(T.square(l2.outputs - y))      # without regularization
# cost = T.mean(T.square(l2.outputs - y)) + 0.1 * ((l1.W ** 2).sum() + (l2.W ** 2).sum())  # with l2 regularization
cost = T.mean(T.square(l2.outputs - y)) + 0.1 * (abs(l1.W).sum() + abs(l2.W).sum())  # with l1 regularization

gW1, gb1, gW2, gb2 = T.grad(cost, [l1.W, l1.b, l2.W, l2.b])
3. 激活模型
定义学习率,训练函数等。
learning_rate = 0.01
train = theano.function(
    inputs=[x, y],
    updates=[(l1.W, l1.W - learning_rate * gW1),
             (l1.b, l1.b - learning_rate * gb1),
             (l2.W, l2.W - learning_rate * gW2),
             (l2.b, l2.b - learning_rate * gb2)])

compute_cost = theano.function(inputs=[x, y], outputs=cost)
4. 训练模型
# record cost
train_err_list = []
test_err_list = []
learning_time = []

for i in range(1000):
    train(x_train, y_train)
    if i % 10 == 0:
        # record cost
        train_err_list.append(compute_cost(x_train, y_train))
        test_err_list.append(compute_cost(x_test, y_test))
        learning_time.append(i)
5. 可视化结果
# plot cost history
plt.plot(learning_time, train_err_list, 'r-')
plt.plot(learning_time, test_err_list, 'b--')
plt.show()

八、保存及提取模型
import numpy as np
import theano
import theano.tensor as T
import pickle

def compute_accuracy(y_target, y_predict):
    correct_prediction = np.equal(y_predict, y_target)
    accuracy = np.sum(correct_prediction)/len(correct_prediction)
    return accuracy

rng = np.random

# set random seed
np.random.seed(100)

N = 400
feats = 784

# generate a dataset: D = (input_values, target_class)
D = (rng.randn(N, feats), rng.randint(size=N, low=0, high=2))

# Declare Theano symbolic variables
x = T.dmatrix("x")
y = T.dvector("y")

# initialize the weights and biases
w = theano.shared(rng.randn(feats), name="w")
b = theano.shared(0., name="b")

# Construct Theano expression graph
p_1 = 1 / (1 + T.exp(-T.dot(x, w) - b))
prediction = p_1 > 0.5
xent = -y * T.log(p_1) - (1-y) * T.log(1-p_1)
cost = xent.mean() + 0.01 * (w ** 2).sum()
gw, gb = T.grad(cost, [w, b])

# Compile
learning_rate = 0.1
train = theano.function(
          inputs=[x, y],
          updates=((w, w - learning_rate * gw), (b, b - learning_rate * gb)))
predict = theano.function(inputs=[x], outputs=prediction)

# Training
for i in range(500):
    train(D[0], D[1])
WARNING (theano.tensor.blas): We did not find a dynamic library in the library_dir of the library we use for blas. If you use ATLAS, make sure to compile it with dynamics library.
1. 保存模型
把所有的参数放入 save 文件夹中,命名文件为 model.pickle,以 wb 的形式打开并把参数写入进去。
定义 model=[] 用来保存 weights 和 bias,这里用的是 list 结构保存,也可以用字典结构保存,提取值时用 get_value() 命令。
再用 pickle.dump 把 model 保存在 file 中。
可以通过 print(model[0][:10]) 打印出保存的 weights 的前 10 个数,方便后面提取模型时检查是否保存成功。还可以打印 accuracy 看准确率是否一样。
# save model
import os

if not os.path.exists('save'):
      os.makedirs('save')
with open('save/model.pickle', 'wb') as file:
    model = [w.get_value(), b.get_value()]
    pickle.dump(model, file)
    print(model[0][:10])
    print("accuracy:", compute_accuracy(D[1], predict(D[0])))
[-0.15707296  0.14590665 -0.08451091 -0.12594476 -0.13424085 -0.33887753
  0.12650858  0.20702686  0.0549835   0.29920542]
accuracy: 1.0
2. 提取模型
接下来提取模型时,提前把代码中 # Training 和 # save model 两部分注释掉,即相当于只是通过 创建数据-建立模型-激活模型 构建好了新的模型结构,下面要通过调用存好的参数来进行预测。
以 rb 的形式读取 model.pickle 文件加载到 model 变量中去,
然后用 set_value 命令把 model 的第 0 位存进 w,第 1 位存进 b 中。
同样可以打印出 weights 的前 10 位和 accuracy,来对比之前的结果,可以发现结果完全一样。
# load model
with open('save/model.pickle', 'rb') as file:
    model = pickle.load(file)
    w.set_value(model[0])
    b.set_value(model[1])
    print(w.get_value()[:10])
    print("accuracy:", compute_accuracy(D[1], predict(D[0])))
[-0.15707296  0.14590665 -0.08451091 -0.12594476 -0.13424085 -0.33887753
  0.12650858  0.20702686  0.0549835   0.29920542]
accuracy: 1.0


